Vpn Configuration For Mac
Selecting the best VPN for Mac can be a hectic job, with many choices and varying features. To make it super easy, I have compiled a complete list of Mac VPNs. If you truly want one of the best VPN services for mac, then perhaps Nord should be your one and only choice. How to Setup Ivacy on FireStick in 2019?
If you are using a Mac, this article is going to be extremely useful to know setting up a VPN Mac. You are well-known about VPN and its wise uses among other technology. It is necessary to know how to setup a VPN Mac?
Once you go through it, you will be well versed with the procedure about VPN setup and Mac VPN client. This article will be useful for both the beginner and experienced person. We are here to help you with 3 options to setup the VPN on Mac connection.
Let’s see how to setup VPN connection on Mac in detail. Part 1: Option One: Setup VPN connection on Mac manually To setup a Mac VPN client, you need: • 1. Server with IP address • 2. Login credentials details • 3. Connection type that is L2TP or PPTP Now, all the required settings pertaining to a VPN can be put under the “System Preferences”, below the Network preference tab. How to VPN on Mac? Step 1: Open System Preferences.
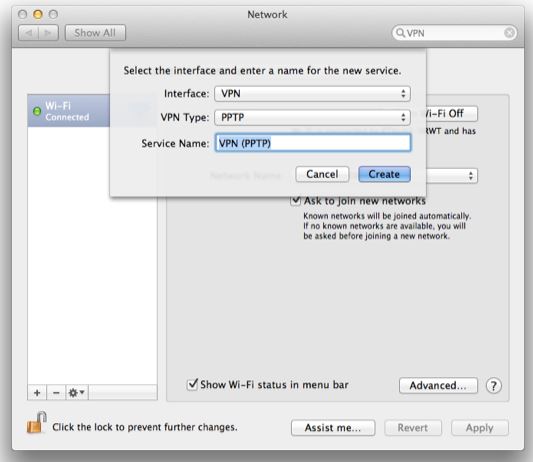
Now select Network. Step 2: Click on the plus “+” icon and select “VPN” under the interface option. Specify whether it is PPTP or L2TP. Step 3: Go to Configuration and then “Add” new Configuration. You can name it as “Server 1”. However, this step is optional.
You can simply enter it in the default configuration. Step 4: Key in the IP Address of the VPN server’s (or FQDN) and the registered username. Step 5: Go to “Authentication Settings”. Enter the password.
This has to be noted that if you have selected L2TP as the secure type for the VPN, then you will be required to enter the shared secret in this panel. Step 6: kindly ensure to select the “Show VPN” status in the menu bar. Now click on “Apply”. Note: Friends you are done, and now you are all set to start! Now a new icon will appear on the menu bar, which would somewhat look like a luggage tag.
Click on this and select the option “Connect VPN”. Once VPN connection gets established, you will see that a timer has started on the menu bar. Now you have successfully established a VPN connection. You can go back to the “System Preferences” where you will see some information regarding connection, which will include your VPN’s IP address too.
The System Preferences will also show the connection details like IP address and the time duration, etc. Part 2: Option Two: Connect to VPN on Mac using VPN Client Following section will show you the guidance to connect the Server procedure by using the L2TP/IPsec as the main VPN Client. Ipad ios emulator.
It was inbuilt on Mac OS X. You will observe that in this example, the details or screenshots are of Mac OS X for Mountain Lion. All the other different versions for Mac OS X are quite similar in such configuration, barring a few very minor changes depending on the User Interface. Initial configuration – to be done as a one time measure: Step 1: Click on the “Network” symbol to the top-right on your Mac system screen. There, click on 'Open the Network Preferences' on the menu. Step 2: Click the “add” or '+' button present over the network config.
Screen, which would look like this. Step 3: Now you need to pick up 'VPN' as 'Interface', then 'L2TP over IPsec' as the 'VPN Type' from the drop-down and click on the 'Create' option. Step 4: With this, a new L2TP VPN has to form, and a new screen to configure the VPN will get displayed on the screen. Step 5: In the above screen, your requirement is simple and to specify the hostname or the server of VPN destination respective to the IP address. Step 6: Once you specify the given 'Server Address”, enter 'Account Name' as a field by typing the username, which is beside the 'Server Address' section/field. Now, click on 'Authentication Settings'. Step 7: Now you will see an authentication window.