Edit Drop Down List For Excel On Mac
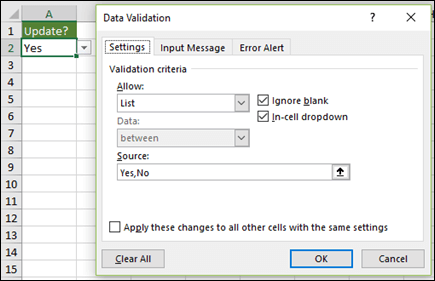
Create a Drop-Down List for a Cell or Range. Choose Data Validation from the Data Tools group on the Data tab. Select the Settings tab. In the Allow box, select List. Click the Source box. Type in a list of values separated by a comma. Make sure the In-cell dropdown box is checked.
• • • • • • • Multiple Item Selection Articles This is the main page for the data validation multiple selection technique. I have also written several blog articles, and you can join in the discussion in the comments there: • • • • • • • • • • • • Video Multiple Item Selection Examples To see how this technique works, and a few multiple selection examples, you can watch this short video. Samsung mtp driver for mac. Your browser can't show this frame. Here is a link to the page Select Items With Drop Down List To make data entry easier, you can add an to your worksheet. Then, click the arrow, and select an item to fill the cell. In the worksheet shown below, you can select any month from the drop down list, and it overwrites any previous entry in the cell. Select Multiple Items From Drop Down List Instead of limiting the drop down list to a single selection, you can use a bit of programming, combined with the data validation list, and allow multiple selections.
With a few adjustments to the VBA code, you can display all the selected items across a row, or down a column, or keep them in a single cell. Fill Across a Row In the first example, each item selected in this drop down list fills the next empty cell at the right. With this option, you could fill player names across a list of innings, or employee names for days of the week. Fill Down a Column Another option is to fill the selected items down a column, instead of across the row. Add Values To the Same Cell With another variation in the VBA code, you can keep all the selected items in the same cell, separated by commas. View the Code for Select Multiple Items The sample workbook uses Excel VBA code, which is set up to run automatically, when you make a change on the worksheet.
To see the code for any sheet in the sample file, you can right-click the sheet tab, and click on View Code. Change the Column Number In the sample code shown below, column 3 is the only one where the change will occur. In the screen shot, the line is marked with a red dot: If Target.Column = 3 Then In your workbook, you could change the 3 to a different number. If Target.Column = 6 Then Or, add more columns in the code.
For example: If Target.Column = 3 _ Or Target.Column = 5 _ Or Target.Column = 6 Then Or, use a starting and ending column. For example: If Target.Column >= 3 And _ Target.Column = 4 Then Or, if you don't want to limit the code to a specific column, you could delete the two rows that are marked with a red dot. When those lines are removed, the code will run when any cell with a drop down list is selected. Change the Sheet and Range Names In some code samples, the sheet names and named ranges are included. You will have to change these to match your sheet names and range names. For example, shown below is a portion of the code from the LineBreakAddSort sheet.
The sheet and range names are highlighted in yellow. Also, this code is set up for a list in column 3. I=ws.Cells(Rows.Count, 3).End(xlUp).Row + 1 You would need to change that number, if your list is in a different column. Video: Multiple Item Selection Setup To see the steps for setting up data validation with multiple selection, watch this short video tutorial Your browser can't show this frame. Here is a link to the page Allow Editing With Multiple Selections With this technique, you can select multiple items from a drop down list, but if you try to edit the cell, you might see a, or find that the VBA code simply added your revised text, to the existing text -- probably not the result that you wanted! Edit the Multiple Selection Drop Down List In the sample file, on the SameCellEdit worksheet, there is an 'Edit Entries' check box. Check that box, and you can edit the cell, without any problems.